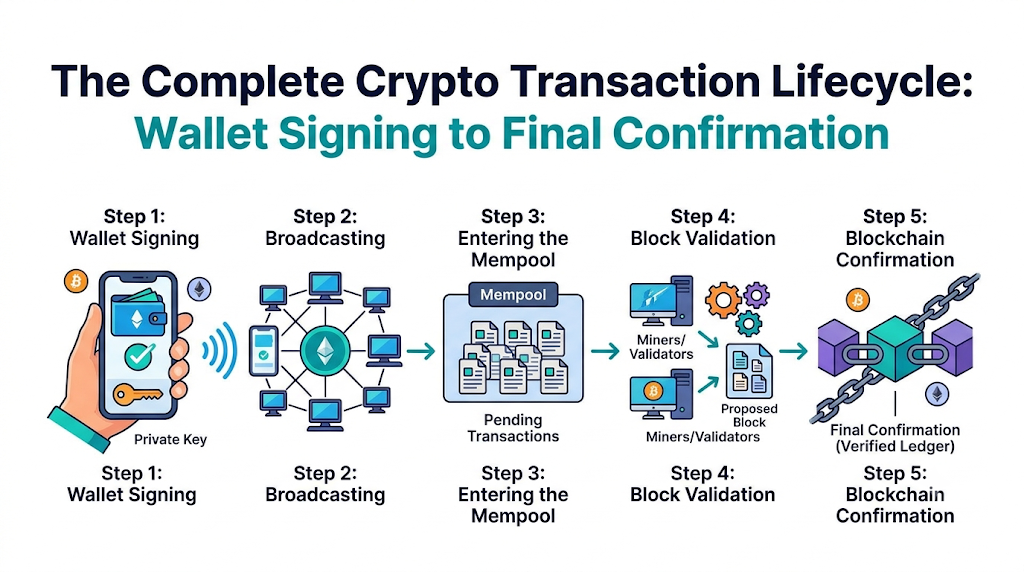
Clicking “Send” in a cryptocurrency wallet feels instant, yet the funds rarely arrive in the recipient’s account a second later. In that gap between pressing the button and seeing a completed balance update, your transfer travels through a decentralized network of computers, waiting rooms, cryptographic checks, and block builders.
Understanding this journey removes much of the stress that comes with staring at a “Pending” status on a block explorer. Whether you are moving Bitcoin, Ethereum, or another digital asset, every on-chain transfer follows a strict, verifiable path from local authorization to permanent ledger entry.
Step 1: Building and Signing the Transaction Inside Your Wallet
A cryptocurrency wallet does not actually store coins inside your phone or browser. Instead, it holds your cryptographic keys and tracks your balance on the public ledger. When you initiate a transfer, your wallet software constructs a structured data packet containing a few core details:
- Sender and recipient addresses: Where the funds are coming from and where they should go.
- Transfer amount: The exact value of crypto being sent.
- Network fee (gas or miner fee): The payment offered to network participants to process the transfer.
- Nonce or input references: A sequence number (used on account-based chains like Ethereum) or specific unspent transaction outputs (UTXOs, used on Bitcoin) that prove you have the funds and prevent double-spending.
Before this data leaves your device, your wallet uses your private key to generate a unique digital signature. This signature proves mathematically that you own the funds and authorized the transfer, without ever revealing your private key to the outside world. Once signed, the transaction is ready for broadcast.
Step 2: Broadcasting to Peer-to-Peer Network Nodes
After signing, your wallet pushes the transaction to one or more nodes—computers running the blockchain’s software. If you use a non-custodial wallet like MetaMask, Ledger Live, or Electrum, your app connects to an RPC (Remote Procedure Call) node that acts as your gateway to the broader network.
That initial node does not immediately add your transaction to the blockchain. First, it runs a series of quick sanity checks:
- Does the digital signature match the sender’s public address?
- Is the transaction formatted according to the network’s rules?
- Does the sending address actually hold enough balance to cover both the transfer amount and the network fee?
If any check fails, the node rejects the transaction on the spot. If everything passes, the node forwards the transaction to its connected peers, which check it and pass it along to their own peers. Within seconds, thousands of nodes across the globe hold a copy of your unconfirmed transaction.
Step 3: Waiting in the Mempool
Once validated by nodes, your transaction enters the mempool (short for memory pool). Think of the mempool as a decentralized waiting room where unconfirmed transactions sit until they are picked up and added to a block.
There is no single master mempool. Every node maintains its own local mempool based on the transactions it has received. Because block space is limited, networks cannot process every transaction at once during busy periods.
To decide which transactions get processed first, block producers look at the fee rate attached to each transfer:
- Higher fees incentivize miners or validators to include your transaction in the very next block.
- Lower fees mean your transaction waits in the mempool until network traffic slows down.
- Extremely low fees can leave a transaction stuck for hours or days, and some nodes may eventually drop it from their mempool altogether.
Step 4: Block Selection and Consensus Validation
To move out of the mempool and onto the permanent ledger, a transaction must be bundled into a new block. How that block gets created depends on the blockchain’s consensus mechanism.
| Stage / Feature | Proof of Work (e.g., Bitcoin) | Proof of Stake (e.g., Ethereum) |
| Block Producer | Miners using specialized computing hardware | Validators who lock up (stake) native coins |
| Selection Process | Solving a cryptographic puzzle to earn the right to propose a block | Algorithmic selection based on staked amount and randomness |
| Transaction Ordering | Prioritized primarily by fee per byte (satoshis/vByte) | Prioritized by priority fee (tip) paid to the validator |
| Initial Inclusion | Added when a miner broadcasts a valid block | Added when the chosen validator proposes a block in their slot |
During this stage, the block producer pulls top-paying transactions from their mempool, executes any smart contract logic (if applicable), and groups them into a candidate block. Once the block is proposed, other nodes across the network verify every single transaction inside it against the protocol’s rules.
Step 5: Achieving First Confirmation and Finality
The moment a valid block containing your transaction is accepted by the network, your transfer receives 1 confirmation. At this point, the transaction leaves the mempool and becomes part of the blockchain’s history.
However, one confirmation is rarely the end of the story—especially for larger transfers or exchange deposits.
Each subsequent block added on top of the block containing your transaction adds another confirmation. For example, if your transfer was included in Block 100, it has 1 confirmation. When Block 101 is added, it has 2 confirmations; at Block 105, it has 6 confirmations.
Why do exchanges and merchants wait for multiple confirmations?
- Chain reorganizations (reorgs): Occasionally, two miners or validators produce a valid block at nearly the same time. The network temporarily splits until one chain grows longer and becomes the accepted version. A transaction in the discarded block gets pushed back to the mempool.
- Double-spend protection: The deeper a transaction is buried under new blocks, the harder and more expensive it becomes for an attacker to reverse or alter history.
Different networks have different norms for when a transaction is considered practically irreversible, known as finality:
- Bitcoin: Many wallets and exchanges require 3 to 6 confirmations (roughly 30 to 60 minutes) for standard deposits.
- Ethereum: Transactions achieve probabilistic finality quickly and reach economic finality after two epochs (roughly 12 to 15 minutes).
- High-throughput chains (such as Solana): Confirmation happens within seconds, though exchanges still apply their own safety buffers before crediting funds.
Common Reasons a Crypto Transaction Gets Delayed
Even when you follow every step properly, transfers can stall along the way. Most delays come down to a few predictable bottlenecks:
- Network congestion: Major market swings, token launches, or popular NFT mints flood the mempool, pushing minimum required fees higher.
- Underpriced gas or miner fees: Setting a custom fee below current market demand puts your transfer at the back of the line.
- Incorrect nonce sequencing: On Ethereum and compatible chains, transactions from a single wallet must process in strict numerical order (nonce 1, then 2, then 3). If nonce 1 gets stuck due to a low fee, nonce 2 cannot confirm until nonce 1 clears.
- Exchange processing queues: When withdrawing from a centralized exchange, the platform may batch user withdrawals or hold transfers for internal security reviews before ever broadcasting them to the blockchain.
Frequently Asked Questions
Can I cancel a crypto transaction after pressing send?
Once a transaction is broadcast and confirmed on the blockchain, it cannot be reversed or canceled. However, if the transaction is still sitting unconfirmed in the mempool, many wallets allow you to replace it by broadcasting a new transaction with the same nonce or inputs and a higher fee—either to speed it up or redirect the funds back to your own address.
Why does my wallet say “Sent” while the recipient sees nothing?
Your wallet marks a transaction as “Sent” as soon as it successfully broadcasts the signed data to a node. The recipient’s wallet or exchange will usually wait until the transaction is mined into a block and reaches their required confirmation threshold before displaying the incoming funds.
What is a transaction hash (TXID)?
A transaction hash—or TXID—is a unique string of letters and numbers generated when your transaction is created. It acts like a tracking number. You can paste your TXID into a public block explorer (such as Mempool.space for Bitcoin or Etherscan for Ethereum) to see in real time whether your transfer is pending, confirmed, or failed.
Do failed crypto transactions still cost fees?
On blockchains like Ethereum, yes. Even if a smart contract interaction fails (for example, due to slippage limits or running out of gas), validators still spent computing resources processing your request up to the point of failure, so the gas fee is consumed. On Bitcoin, invalid transactions are simply rejected by nodes and do not enter a block or incur fees.
How can I speed up a stuck transaction?
If your wallet supports Replace-By-Fee (RBF) on Bitcoin or a “Speed Up” feature on Ethereum, you can rebroadcast the exact same transaction with a higher fee. Miners and validators will prioritize the higher-paying version and ignore the original lower-fee version.
Key Takeaway
A cryptocurrency transfer is not a direct message from one app to another; it is a public state update agreed upon by a global network. From the moment your private key signs the request to the instant multiple blocks lock it into place, every step exists to prove ownership, prevent fraud, and keep the ledger accurate without relying on a bank or central clearinghouse.